Camera Guides for Beginners: Understanding Video Capture
Camera Guides for Beginners: Understanding Video Capture
Written by: Gregory MillerOver the past few decades, camera technology has evolved by leaps and bounds from taking simple photographs to shooting high definition videos and capturing epic cinematic shots. Today, most photographers and videographers use digital single lens reflex cameras, which are commonly known as DSLRs. If you are new to the art of capturing footage, this guide will help you understand the pros and cons of using DSLRs and how these cameras work to shoot video.
Shooting Videos with DSLRs
While some digital cameras were only able to offer 720p and 1080p video capture, many DSLRs can shoot cinematic 4K UHD video with phenomenal quality. Whether you are shooting portraiture, action sports or family events, DSLRs offer an extended list of zoom lenses that you can attach to meet your needs. Even though digital cameras can capture pristine photos and videos, here are a few more things you should know.
Storage
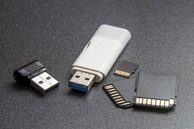
A key fact a videographer should know is how much footage your memory card can hold. DSLR cameras utilize high-speed memory cards during the video capturing process. The most popular choices are Secure Digital High Capacity cards known as SDHCs, and Secure Digital eXtended Capacity cards known as SDXC. Memory cards play one of the most important roles in capture video because the successful storage of video requires a card capable of keeping up with faster data transfer, which can range from a stand megabyte speed to much faster speeds depending on price. While both SDHC and SDXC cards look alike, they are not the same. While SDHC cards are widely supported in almost all DSLRs that have a SD card slot, SDXC cards require a special SDXC slot for compatibility that was introduced in 2011. You need to ensure that your camera is SDXC compatible. SDXC cards offer faster read/write times than SDHC cards, and are available in storage capacities higher than 32GB, making them ideal for video recording.
Shooting style
As a photographer or videographer, you may be accustomed to a certain shooting style when focusing on and capturing your subjects, but some DSRLs are not specifically designed for video capture. Have you ever tried viewing an LCD screen on a sunny day? It is quite difficult without a cover, which usually makes it easier to view the screen after the shoot is complete. However, there are some cameras that offer a flip out screen feature that can help you when you’re filming from an awkward angle. Moreover, relying upon an LCD screen as a monitor will require you to hold the camera away from your body to adequately view the screen. Not only is this not the proper way to hold a camera, but it can also lead to camera shake. You could always use a tripod to rectify this issue, but you’ll be stuck in one spot, which takes away the freedom of movement that cameras naturally provide.
Focus and exposure
Nothing’s worse than blowing up an out-of-focus HD video on a big screen TV. To avoid this issue, you should set the focus on your subject before switching to Live View. Some DSLRs permit the user to autofocus in live view mode, but it tends to run slowly. In fact, you may find manual focus mode preferable. While you are recording, auto exposure continues to run. Though this may not seem like a problem on the surface, any or all changes in exposure during a clip will stand out. The best way to go about this is to lock the exposure before you start shooting. It is rare for professional videographers to use auto exposure or auto-focus because it’s far simpler to make corrections to exposure errors on an entire clip than making corrections on small segments within a sequence.
File sizes
When you are shooting still images you have two options: you can either shoot RAW files that typically take up more file space or, you can store more images by using JPEG compression. JPEG may give you more file space to capture more images, but the quality takes a hit. When it comes to video, there is no RAW equivalent. Therefore, CODECs are used in its place to compress the video file. Notice that when shooting High Definition videos, more storage space is used even when you're shooting short videos. For example, a four-minute sequence that was captured in Full-HD (1920 x 1080) were to be compressed with MPEG-4, it would take up a little more than one gig of memory. The same four-minute video would take up over 32,457 gigabytes of memory without compression. As you can see, compression is absolutely vital to file size.
Learning Your DSLR Camera Settings for Video Capture

Digital single-lens reflex cameras have become popular in the world of film and movies. Professionals expect perfection from their equipment and have learned to tweak the internal settings of their cameras for maximum effectiveness. If you're going to using a DSLR to shoot, here is what you should know about your camera.
Settings
First, it’s crucial that you understand that video mode and still photography are entirely separate things. One of the first settings you will want to play with is the Picture Control profile and White Balance. This will allow you to achieve the “in-camera look” that you’re trying to capture. When it comes to video, these types of settings are “baked-in” so there’s not much you can do to fix any issues you may find after you’ve captured the video. To further elaborate, the term “baked-in” refers to the camera applying the Picture Control profile and White Balance settings in a non-raw format so that neither setting could be changed later. Essentially, what you see is what you get. You can fix issues like this with an in-camera tool called live “Histogram” on your DSLR. This tool displays exposure levels that you should play around with until you achieve the look you are trying to capture in your video.
Resolution/Frame Rate
If you want the best quality video that you can possibly get, you should use the highest resolution. Some DSLRs have a maximum resolution of 1920 x 1080, which will help you capture the crisp clear footage you are looking for. Frame rate is also an issue that professionals keep a close eye on. In the United States, the standard for the movie industry is 24 frames per second whereas in Europe, it’s 25 frames per second. Higher the frame rates produce smoother video during playback.
Frame Shutter Speed and Frame Rate
There are rules associated with shutter speed. To capture what the average person perceives as normal motion, you have to use the correct shutter speed for each specific frame rate. Here are the rules you should keep in mind:
- A slow shutter speed will lead to more motion blur in visible moving subjects.
- The shutter speed should be double the frame rate.
- Higher shutter speeds mean less motion blur when subjects are moving.
- Videos are much smoother and more natural when the right amount of motion blur is present in the subject.
Due to the limitations of shutter speed and frame rates, the settings cannot be changed while the camera is capturing video. This translates to videographers being forced to use only filters, ISO, and aperture as tools to obtain the exposure that they are seeking. This can especially be a problem in a bright environment.
Manual Focus
When it comes to shooting video, manual focus is the norm. Even the most expensive cameras in Hollywood do not have the ability to autofocus. Fun fact: A person regarded as a focus puller must focus the camera manually. As a beginner, learning the ins and outs of manually focusing your camera is one of the most important things that you can learn. You can make things easier on yourself by using lenses that can be easily focused. Also, you should get lenses that have a broad focus ring and long throw.
Another choice for manual focus cameras are macro lenses. Macro lenses were designed to be manually focused, which even applies to the AF models. Just as it does with photography, initiating a recording session with the lens open makes it increasingly difficult to attain sharp focus. One thing you can try doing is stopping down the lens thus sharpening and increasing depth of field. You can use an external monitor purchased separately to confirm that the focus has been set up properly.
Stabilization & Audio
There’s nothing worse than a shaky camera. Most professionals almost always have a sturdy tripod on hand to achieve the sturdiest shots. Not all tripods are made the same. Unlike photo tripods, video tripods are specifically designed to pan and tilt. Photo tripods will typically only work for shots that require zero movement on the part of the camera. If it is not possible to use a tripod for one reason or another, check to see if your DSLR has a Vibration Reduction option in the settings. This can lessen or even completely eliminate shake. If you transition back to a tripod, ensure that VR has been turned off. Otherwise, it might interfere with panning and tilting during shots.
Audio is just as important as the video itself. Always be aware of your surroundings. The microphone on your camera may pick up all ambient noises around you such as woodland critters, wind, airplanes, cars and much more. If you do not want any extra background noises, make sure you are shooting in the right environment.
Last Thoughts
Hopefully, you now have a deeper understanding of how video capture works when using a DSLR camera. The questions you should be ask yourself the next time you want to capture footage are: Do you need your video to be Hi-Def? How much movement is involved? Is there any ambient noise in the background that might be picked up by the microphone on your camera? No matter what you decide, understanding the art of video capture is key to producing the best footage possible for yourself and your viewers.
- 7th June 2018