What is a densitometer?
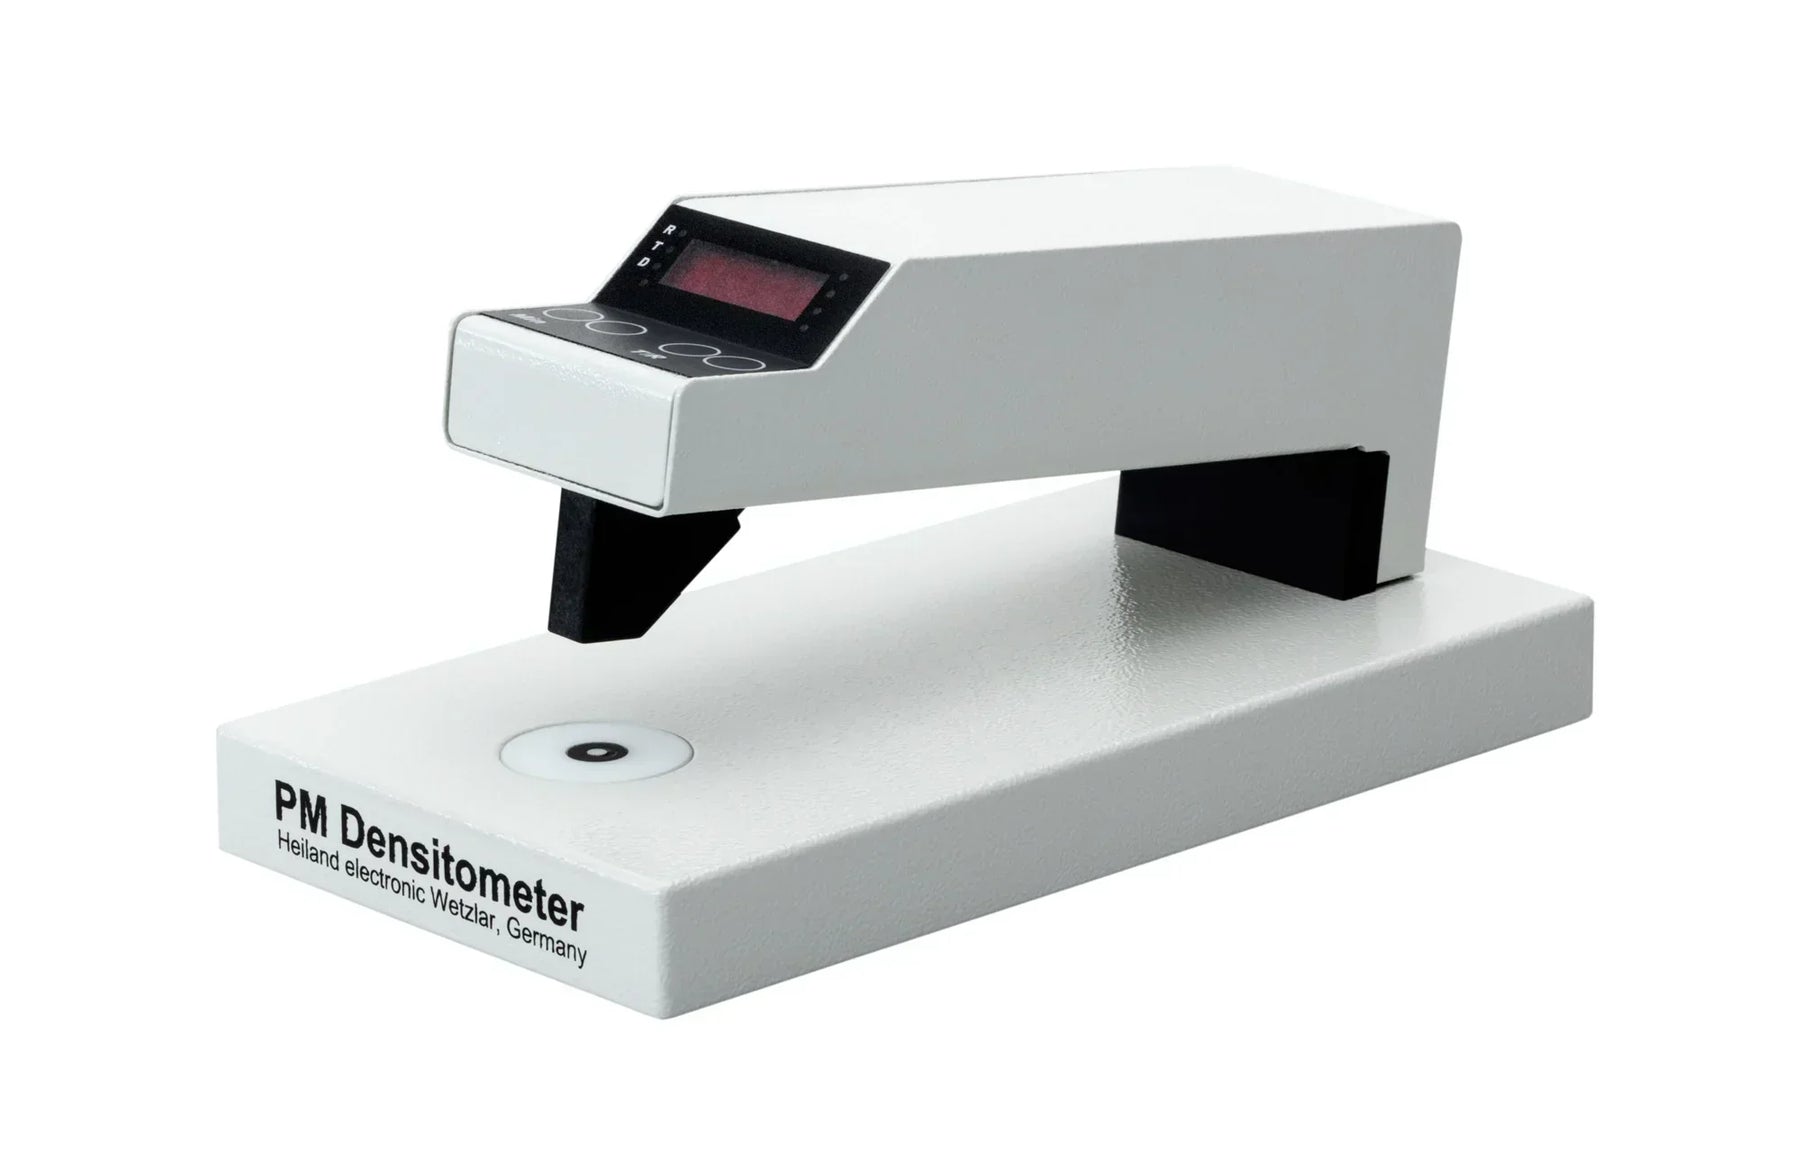
It’s an optical instrument used to measure the density (built in darkness) of photographic film and paper. Without one, objective evaluation is quite difficult. You position the material between the light source in the head of the device and the photoelectric cell in the base to achieve a reading.
But what can be achieved by measuring optical density?
By precisely measuring the relative density you can make the best of the exposure and development of the film or paper. A relatively dense negative will not allow much light to pass through it while a relatively dense print will not reflect much light. A logarithmic scale is used in measurements. 50% absorption is expressed as 0.3 which is equal to one f stop. Typically, in 35mm you would not expect to normally measure density with a log value of more than 1.0 meaning you only expect four f stops in a range. To use a densitometer properly, you should have a good basic knowledge of f stops and how they affect your picture taking and making.
By using a densitometer, it allows you to describe the tonal range of a negative in a standardised way. A negative with a short tonal range has a low-density range, while one with a long tonal range has a high-density range.
Why do so few photographers own one?
1. Lack of information. Many film photographers who might find densitometers helpful if they were aware of the potential benefits, don’t understand what densitometry can do for them, and aren't motivated to investigate.
2. Cost. Densitometers have always seemed expensive. The best argument in favour of densitometers is that they provide objective information about materials' characteristics and process behaviour. Film photographers who comprehend the significance of this information and bother to apply it, can save both time and supplies, and gain better control of the processes than is otherwise likely. In other words, densitometers are to photographers what tape measures and levels are to carpenters; certainly, you can get along without them, but they make your work easier and more efficient.
Black-and-white densitometers are most useful if you work in large format black-and-white and are seriously interested in increasing your ability to predict and control the quality of your photographs. The connection is clear: image quality depends to a considerable degree on gradation; gradation is controlled to a large extent by the characteristics of film, film developer, and paper; and densitometers can analyse these characteristics with precision. The information that densitometers can prove can unquestionably make you a better technician, and quite possibly, a more confident artist as well.
How to use the information to get a better negative
Using a densitometer can be used to correct exposure or development issues, but only the next time around. Once you’ve shot and developed a film “incorrectly” you can compensate slightly during printing, but really the log readings should be recorded to improve things for future use. Of course, this with prints assumes you’ll use the same film and developer on a regular basis. To do this, we suggest taking five negatives on the same film to compare sensitivity.
Often rating a set film speed, say 100 ISO at a lower 64 ISO can be a safer way for oversensitivity. Remember, overexposed, dense negatives can be a problem to print.
How to use negative development information to improve printing
If you print with a diffused enlarger, then contrast between the lightest and darkest area of the negative should be 1.0 to 1.1 log D. Contrast on Multigrade paper is influenced by the exposure and development of the film. By increasing your development time of the film, you’ll increase the contrast and reducing the time will lower the contrast. This information is valid for areas of the negative that has detail in it. Typically, you’d ignore areas like sky, candlelight, sun or water. Also, skip measuring highlights and deep shadows.
Extras to personalise your densitometer
The “standard” densitometer light aperture is 3mm, but a set of smaller apertures for controlled measurement is also needed. A USB port to export data to a computer and then create their own curves is also sometimes needed. For working with alternative processes, a replacement UV-LED light (for the white version) could be an answer when measuring contact negatives. Also, you can get a manual 4-colour LED if working with Pyro (stained) film measurements.
Using a densitometer with prints
With prints, you’ll be measuring reflected values. Now there is no absolution of reference, so please use the unexposed white areas as a reference.
Then, simply measure all the points of the density of the print.
It’s easier if you can reach maximum values, i.e. whites of an eye (say 1.7 value) or the darkest point. The typical value of resin coated gloss paper has a 2.0 log D with details (say in the eye) meeting 90% of maximum. Fibre based paper has a higher log D value of 2.1-2.2 and toning will increase it further to around 2.4 log D. If your paper is overexposed, more areas will be black, but the maximum log D values will not increase.
These relatively simple, economic tests for negatives and prints will show you that films and papers and are not all alike; each has a "personality" that will influence the look of your prints. If you recognise the importance of these differences and study them, you can predict what their combined effects are likely to be. By revealing these materials' characteristics clearly and efficiently, densitometers can help you choose the combination of film, developer, and paper that is most likely to provide the image quality that you want.
Models of densitometer on the market
We recommend the use of Heiland Densitomers stocked by us. They are handmade in Germany, and two models are available.
The TRD-2 is the basic black and white densitometer for measuring density in transmission and reflection. The TRD-Z is the same but with an alternative display for working in the Zone System (percentage of tone value).
They both include tact-switches used to select the operating modes - "R" for reflection and "T" for transmission and to set the display to zero.
Pressing the arm down on the film turns on the reading light in the base. The density value is displayed in bright red numerals, to 2-decimal precision, in a prominent panel on the front of the arm. A reading accuracy of +/- (1% + 0.02logD), and repeat accuracy is +/-0.01 is guaranteed. The maximum rated transmission density is 3.5, but the instrument will read to 4.0 at 2% accuracy.
Converting the instruments to take reflection readings is just a matter of pressing the tact switch called “T/R”.
In that mode, lowering the arm turns on a lamp in the arm itself, and the light is beamed down onto the reading area at a 45-degree angle, a standard arrangement for reflection density readings. The maximum reflection density limit is said to be 2.5, which would be more than sufficient for reading any silver print density. As is the case with transmission readings, the readout is virtually instantaneous. In both operating modes, pressing a red button on the top surface of the arm will zero the instrument; the display flashes "-888" when you exceed the measurable reading limit, which is a useful alert that's considerably better than simply providing a false value.
The lamp is switched on when the arm is depressed halfway making it easy to identify the reading area visually, at least for reflection and medium density transmission samples, but positioning heavily dense transmission samples properly over the aperture is still a guessing game.
There is a lifetime warranty of the lamp and reproducible measurement, and the main body of the units are of solid metal construction.