Toning-back-to-basics
 Print
Print
Toning
Introduction
Toning a black and white photograph is the process of converting the silver within the print to another metallic compound. It’s a chemical process that can be done without a darkroom and always with normal lighting on. It’s a great way to spend time creating a “personalised” print during long winter evenings and in the first or our “Back to Basics” articles we explore the options and possibilities for this historic art form.
In a sense, adding false colours back into an image which has been deliberately drained of its original colours sounds a little perverse. But toning is a popular way of helping to change the `feel' of monochrome images. Warm colours such as selenium and sepia can help to create a peaceful, calm mood, whilst the hues from gold and blue toners can generate a chilling edge to images.
The relationship between image colour and mood is important, because it will affect the message of your image. Get it wrong, and all your image does is to confuse: like shouting "I love you".
Too many photographers seem to think that toning is a “craft skill” (for which read “trick”) for turning an ordinary photograph into an exceptional one. Toning which is sympathetic to the subject and mood of an image can certainly enhance a photograph, but it is very unlikely to rescue it from oblivion.
General pointers
Toning is not only good fun, it is a simple technique. In most cases, the technical complexity extends only so far as putting a print in a tray of liquid, watching the colour change, removing the print and washing it. It really is as simple as that.
The toning is applied to prints after they have been processed and washed in the normal way and can be undertaken in ordinary room lighting or even outdoors. Good ventilation is recommended.
Before we look at the individual toners, here are some general pointers. Different papers will respond differently. Generally speaking, fibre papers react more enthusiastically than resin coated papers, and warmer tone (e.g. chlorobromide) papers respond better than cold tone (e.g. bromide) papers. The developer used can also influence the result. It is not only the extent of toning which is affected by these variables, but also the colour. This means that getting to know your materials is an important element in achieving predictable results.
Some papers will prove unwilling to respond to certain toners getting some resin coated papers to react to gold toner, for example, can be difficult and you can put some prints in selenium for hours with relatively little apparent effect.
Clean working methods are essential for efficient toning. It is important to wash dishes carefully to prevent contamination between toners the working life of gold toner, for example, is significantly reduced if it becomes contaminated with even small amounts of selenium toner. Dishes which have been used for bleaching must be washed thoroughly before they are used for other chemicals - indeed, some photographers will keep separate trays for specific toning and bleaching processes.
It is vitally important to wash prints thoroughly between toning processes. Poor washing will result in “streaky” or “uneven” toning and can result in chemical blotches which are difficult to remove. Fibre prints, in particular, need prolonged washing between processing stages to prevent chemicals being carried over from one bath to the next.
Types and Brands of Toner
The most common toners used with modern black and white printing include Sepia, Blue, Copper/Red and Selenium. All of these toners are available Fotospeed. Tetenal also offer alternatives with Rockland providing unique options of some standard toners.
Sepia toning
 |
 |
|
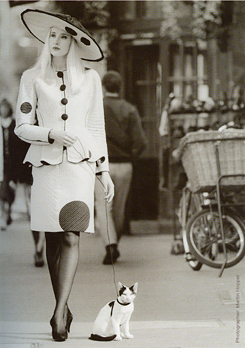
Figure 1 Black and White print untoned. |
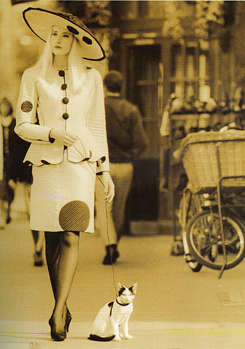
Figure 2 Sepia toned. Print was placed in toner solution (diluted 1+9) for 1 minute and washed under running water for 2 minutes. |
The thiocarbamide formula for sepia toning offers both an “odourless” process
and one in which the colour of the tone can be controlled between a light yellow-
brown and a rich dark brown. The Fotospeed ST20 sepia process is one of
many proprietary kits available.
Sepia toning is a two-bath process: the print is first bleached and washed, before toning and the final wash. If you wish to make your own sepia toner, here is one of many available formulae:
Bleach
Potassium ferricyanide 100g
Potassium bromide 100g
Water to make 1 litre
The amount of potassium bromide used can be reduced for warmer tones.
Toner solution A
Thiocarbamide 100g
Water to make 1 litre
Toner solution B (activator)
Sodium hydroxide 100g
Water to make 1 litre
Add the sodium hydroxide to the water slowly.
This formula provides a strong bleach and highly concentrated stock solutions for the toner and activator. The bleach can be used at much higher dilutions where partial toning is required.
Working solutions for the toner can be mixed according to the colour required. To make 1 litre of working solution toner:
Colour Toner A Toner B Water
Purple brown 20ml 100ml 880m1
Cold brown 20ml 60m1 920ml
Mid-brown 20m1 20ml 960m1
Warm brown 60m1 20m1 920ml
Yellow brown 100ml 20ml 880m1
The colour will vary between different papers and depending on the paper developer used.
The basic process is simple: bleach the print until all the blacks in the image have been removed. Wash until the yellow stain has been removed. Place the print in the toner until no further colour change takes place and then wash. With warmer colours, rinse the toned print and immerse in a bath of 2% solution of acetic acid, which will help to remove surface “scum” and clean-up highlights. Then wash the print thoroughly.
To get richer tones, you can start the process by immersing the print in the toner bath for 3 minutes and washing then complete the process as normal.
This thiocarbamide formulation generally retains the image density of the original, but with the higher concentrations of thiocarbamide (for the yellow-brown tones), image density may reduce slightly, so it may be necessary to start with a slightly darker print than normal 10% extra exposure).
If you wish to retain the blacks in the print, only partially bleach the image before toning. For example, add 100ml of the normal strength bleach to 900m1 of water to get a much softer working bleach bath, pulling the print when the highlights and light greys have disappeared. The toner will `take' more evidently in the lighter tones leaving the darker tones with much less evident colour shift. When using partial toning, the print should be rinsed and then fixed before washing.
An interesting variation on sepia toning is (after thorough washing) to place the print in gold toner. This gives a much redder image.